Laconia sees its first frost between October 11 and 20 in an average year. A boat with water still in the cooling system when that happens can need engine work, fuel system repairs, or a new block before it floats again in May.
The work itself isn’t hard. The order matters, the details matter, and skipping an hour in September often costs several hundred dollars the following spring.
When to Winterize Your Boat in New Hampshire
September. Not because the season ends that early, but because that’s when service schedules are still open. By the middle of October, most marine shops run three to four weeks out or stop taking boats, and the ones that come in on the last warm weekend get rushed.
Mercury’s own guidance is to winterize once temperatures consistently dip below 50 degrees, which in the Lakes Region means you’re already late by Columbus Day. Get on a schedule in September even if the boat stays in through early October.
If the engine work is outside your comfort zone, split the job. Handle the cleaning, battery, and canvas yourself and have a tech cover the engine. That split is how most experienced owners run it.
Step 1: Final Cleaning Before Storage
Cleaning gets rushed more than any other step, and it’s the one with the most visible consequences in spring. Algae, bird droppings, and water residue bond to aluminum over six months of sitting. Mildew does the same to vinyl and canvas.
Wash the hull and tubes with fresh water, getting into the brackets and around the drain plugs where water collects. Clean under the seats and inside the storage compartments. Then pull everything loose off the boat, including life jackets, ropes, anchors, electronics, and cushions, because anything that holds moisture in an unheated space will show it by spring.
Let it all dry completely before covering. Shrink wrapping a damp boat seals in moisture with no air movement to slow the mildew down.
Step 2: Prepare the Engine for Winter
This is where winterization goes wrong when it goes wrong. If you’re new to it, have the manual for your specific engine open before touching anything, or hand this part to a factory-trained tech.
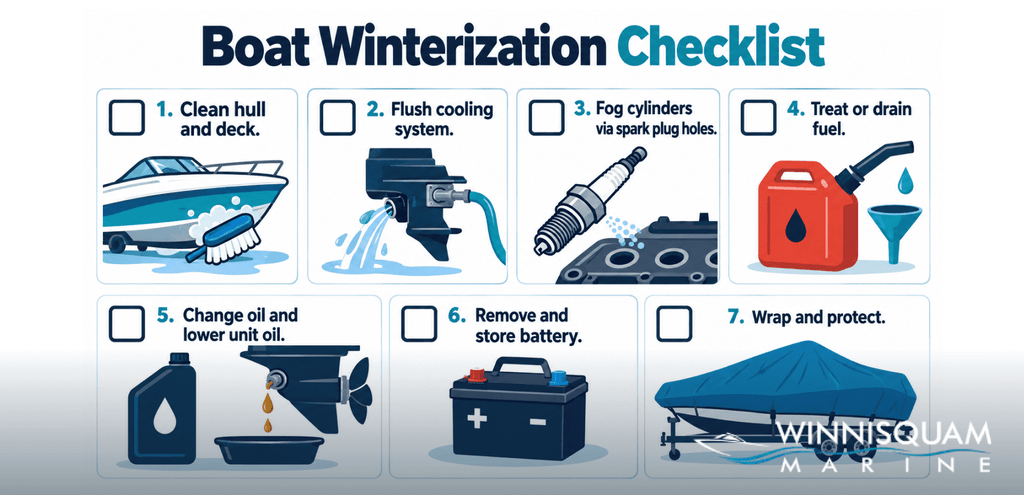
1. Flush and Drain the Cooling System
An outboard circulates lake water through the engine to control temperature, and that water has to be fully out before the first freeze. Water expands as it freezes, and water trapped in internal passages can crack the block.
On a Mercury outboard, flush with fresh water through the static flushing port, and never run the engine on the static port alone. Running without water drawn through the lower unit intakes destroys the water pump impeller in seconds. If you need the engine running to circulate treated fuel, clamp flushing muffs over the lower unit intakes instead.
After flushing, tilt the engine to the full down position and let gravity drain the passages and exhaust.
2. Protect the Cylinders From Corrosion
Fogging oil coats the cylinder walls so they don’t corrode while the engine sits. On Mercury’s fuel-injected four-stroke, the procedure runs through the spark plug holes, not the air intake. Pull the plugs, spray each cylinder, turn the engine over by hand a few times, and reinstall.
Spraying through the intake is a carbureted-era habit, and on a fuel-injected engine it risks fouling sensors in the intake tract. Late-season humidity works into an unprotected engine over a Lakes Region winter, so this 15-minute step is cheap insurance.
3. Treat or Drain the Fuel
Two valid approaches here. The first is to fill the tank to roughly 95 percent, add a marine stabilizer at the label ratio, and run the engine on muffs for 10 to 15 minutes so treated fuel reaches the whole system. A near-full tank keeps condensation from forming, which is the main source of water in stored fuel.
The second is to drain the fuel system completely, the preferred route on carbureted outboards and some older injected systems. Check your engine’s manual before picking one.
4. Change the Engine and Lower Unit Oil
Change the oil and filter before storage, not in spring. Used oil carries acidic combustion byproducts that keep corroding the crankcase all winter.
On outboards, change the lower unit gear oil too, and watch what drains out. Milky or white oil means water in the lower unit, which means a failed seal rather than a maintenance item. Finding that in October leaves time to fix it before the spring rush.
Step 3: Battery Removal and Storage
A battery left connected through a New Hampshire winter either freezes or discharges past recovery. Disconnect it, pull it, and store it somewhere above freezing and out of direct sun. A fully charged lead acid battery won’t freeze at typical NH winter temperatures, but a half-charged one can.
Put it on a trickle charger. A battery that sits discharged for six months sulfates and permanently loses capacity, and a tender pays for itself with the first battery it saves.
Step 4: The Pontoon Tubes
Aluminum tubes mostly take care of themselves, but walk under the boat before storage. Look for dents, cracks at bracket attachment points, and any discolored or pitted aluminum. A dent that creases the tube wall affects buoyancy and is worth evaluating before it sits through a winter.
Confirm the drain plugs are seated and sealed if your tubes have them. Water inside a tube freezes, expands, and damages the structure, and that repair costs far less in October than in May.
Step 5: Canvas, Upholstery, and Furniture
Vinyl and canvas that go into storage damp come out with mildew. Wipe all the vinyl down with a marine cleaner and conditioner so it doesn’t dry out and crack through temperature swings.
Bimini tops and enclosure panels either come off and store inside, or get cleaned, dried, and covered in breathable fabric. Plastic traps moisture against the canvas. If the whole boat is getting shrink wrapped, everything under the wrap has to be bone dry first.
Step 6: Shrink Wrap or Cover
A proper shrink wrap job blocks UV, keeps debris out, and protects the canvas and upholstery underneath, as long as vents are installed so air keeps moving inside the wrap. If the boat is headed into indoor winter storage, the cover question gets simpler, but the drying rule doesn’t change.
Mice find their way into almost any stored boat and chew wiring, upholstery foam, and canvas. Steel wool stuffed into openings around the engine compartment and through-hull fittings is the cheap deterrent that actually works. Traps or bait stations around the storage area add a second layer.
Step 7: Trailer Maintenance
Grease the wheel bearings if it’s been a full season since the last service. Check the trailer lights while there’s still time to fix them before spring. Inspect the bunks or rollers, because a bunk worn through its carpet sits metal against the hull all winter.
DIY Winterization vs Professional Service
The engine is the part worth paying for. Fogging done wrong, a skipped lower unit oil change, or an unnoticed cooling system problem can mean a rebuild instead of a minor spring fix. The cleaning, battery, canvas, and trailer work are all within reach for most owners.
Our service department is the largest in New England, with factory-trained techs on Mercury and MerCruiser, and the winterization calendar fills fast once October arrives. Schedule an appointment in September and you pick the date instead of taking what’s left.
What Can Go Wrong Without Winterization
Most spring damage traces back to water left in the system, untreated fuel, or parts that sat dry too long. The usual repair bills look like this.
- A cracked block or damaged cooling passages from water that froze inside the engine
- A dried, cracked water pump impeller that fails on the first spring start
- Separated, water-contaminated fuel that gums the injectors or carburetor
- A sulfated battery that won’t take a charge after six months flat
One rule covers the whole job. Treat anything involving the cooling system or the lower unit as a deadline item with the middle of October as the cutoff, and let everything else flex around the weather. Winterization slots at our three locations fill through October, so September callers pick their dates.
Winterization FAQ
How much does it cost to winterize a boat?
Professional winterization runs $300 to $600 for most single outboard setups, with larger engines and sterndrives costing more, per Sea Tow’s service estimates. Shrink wrap is a separate charge based on boat size.
When is too late to winterize in New Hampshire?
The middle of October. Laconia’s average first frost falls between October 11 and 20, and a hard freeze with water still in the cooling system is when blocks crack. Shops stop offering short turnarounds well before then, which is the real argument for September.
Can I winterize my pontoon boat myself?
The cleaning, battery, canvas, and trailer work, yes. The cooling system flush, cylinder fogging, and lower unit oil change need the right tools and enough mechanical familiarity to spot a problem, not just follow steps. If you’ve never changed lower unit oil, that’s the part to pay for.
Does an outboard need to be fogged for winter storage?
Yes, for any outboard sitting more than 30 days. On fuel-injected four-strokes, go through the spark plug holes rather than the intake. It’s a 15-minute job that protects an engine worth several thousand dollars from corrosion.
What’s different about winterizing an inboard or sterndrive?
The cooling system. Outboards self-drain when tilted down, while inboards and sterndrives have circuits that need draining at specific points or blowing out, usually with antifreeze added to the raw water side. Sterndrive bellows, boots, and gimbal bearings need their own inspection, so on a Monterey with a MerCruiser drive, that job belongs with someone who knows the system.